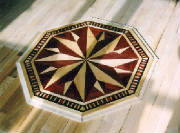
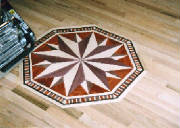
Installation Instructions for floor inserts.
First things first; if your medallion arrived with any damage at all, please let me know. (After you've
contacted the shipper, natually.) It's fully insured, so check it carefully. For your information, most
medallion manufacturers ship their products unsanded and unfinished, but I usually sand and finish mine simply out of pride,
time permitting. (I just think it adds to the "Wow" factor.)
Believe it or not, now comes the fun part. I'm not sure if you're doing it yourself
or having it done, but it is fun to install them. Please leave the medallion in the room its being installed in for 3 or 4
days so that the wood is acclimated to the temp, humidity, etc, OK?
To begin with, position the medallion exactly where you want it, then nail the template pieces around
the medallion. Each is numbered and correspond to the numbers on the side of the piece. Use 3/4 inch brads and don't
worry about the nail holes; you'll fill them in later. Use three or four nails on each piece of the template and make sure
they're secure. They should fit snugly around the medallion.
I assume you're going to use a router to cut out the opening, so fit it with a 1/2 inch, 3/8s, or 1/4 inch straight cutting
bit and don't try to go all the way through the floor on the first pass. Take about a quarter inch with each cut. You'll no
doubt hit a nail or two, but don't worry; the router makes short work of them. (After the first pass, the nails will
be exposed, so it's a very good idea to get a nail set and drive them into the floor....saves on router bits.)
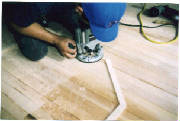
OK, you've cut out the opening for the medallion, so now it's time to remove the flooring from the center of your opening. Trying
to pry old floor boards from the edge can damage the edges of the floor that butt the medallion, and you don't want that,
so leave the template pieces in place as you pry up the floor pieces.
Before you remove the template from the floor, make sure you take a very sharp chisel to the outside corners
as they'll be somewhat rounded no matter which bit you're using. Cut them as sharp as you can so the medallion drops in with
no resistance. At this point, it's a good idea to dry fit the medallion to make sure it's as flat and snug as
possible. I take great pains to insure that both the top and the bottom are as flat as possible, but there's no assurance
that your floor is as flat. Make sure you clean and remove any bits of flooring or old adhesive from the floor and make
certain that the medallion is as flat as possible against the floor. It's a good idea to lay a piece of string in the
opening before dropping the medallion in for dry fitting; that way, you'll be able to remove it without damaging the edges.
Or tightly attach a piece of duct tape to the underside of the medallion so that you can lift it out without prying.
If you find the medallion rocks even the least bit, shim it to assure there is no movement; if it rocks the slightest bit,
you'll no doubt have problems in the future, so this step is important. It must be flat with no rocking.
Assuming the medallion is laying as flat as possible (any rocking could destroy glue joints or, even worse,
crack the wood itself), remove the medallion and apply some good adhesive into the opening before you drop it back in.
Check with your floor installer or the nearest home goods department store and get a water soluble glue. Don't
be afraid to put some weight on the medallion after dropping it in; stand on it and try to get it as level as possible.
God forbid you have any air pockets as it may rock after the glue dries. Placing something heavy on it after installing
it is a good idea.
If you have leveled it properly, you won't need a great deal of sanding on the top, but if you do, I'd recommend
you rent a floor sander from Loews or Home Depot. They make the job much easier. Feel free to sand immediately after
you install it; the glue needn't be dry. In fact, the sooner, the better.
Before you sand, put a small amount of glue into the holes where the brads were inserted in the floor, then sand right
over the whole thing. The sawdust works its way into the holes and won't show at all. (Woodworkers call this "gooping".)
Likewise around the edge of the medallion, assuming you have any gap at all.
Don't feel bad if you're forced to sand some of the finish off; it can be brought back in no time. All that's
required is a little elbow grease and some patience. Don't be in a big hurry; start with 120 and work your way to a
fine grit, then finish with the finish of your choice. (Most people prefer a matte or satin finish, so pick
up some satin or semi-gloss polyurathane and some foam brushes; that'll give you excellent results.) I prefer an oil
base, but some people think water based is easier, due to less clean up time, but that's strictly personal preference.
I don't think you'll have any problem installing it if you're at all handy with your hands. One favor; I'm sure friends
and family members will be admiring it and asking questions in the future, so any referrals would be sincerely appreciated.
Just don't mention what you paid for it as the prices will probably be going up in the future. I can't believe the demand
for them as the last three I put up were snapped up in a heartbeat. By the way, I'd love it if you'd send me a
picture when you're all finished.
If you should misplace these instructions, you can find a copy of them on my website.....http://woodenitbeloverly.tripod.com.
Thanks again and have fun.
Phil Hunt
(the silverfox)
Click here to return to the home page.
"Wooden........it be loverly!!"(home of reasonably priced floor medallions.)
|
